Your Fastify app listens on localhost:3000. It works on your laptop, it works over SSH with a curl. Then you point a browser at the public IP on port 3000, and now you’ve got Node terminating TLS itself, serving its own static files, and getting held hostage by one mobile client on a train tunnel connection that takes nine seconds to send a request body. That last one is the quiet killer — a slow client ties up an event-loop-bound Node process the whole time it dribbles bytes.
Working proxy setup
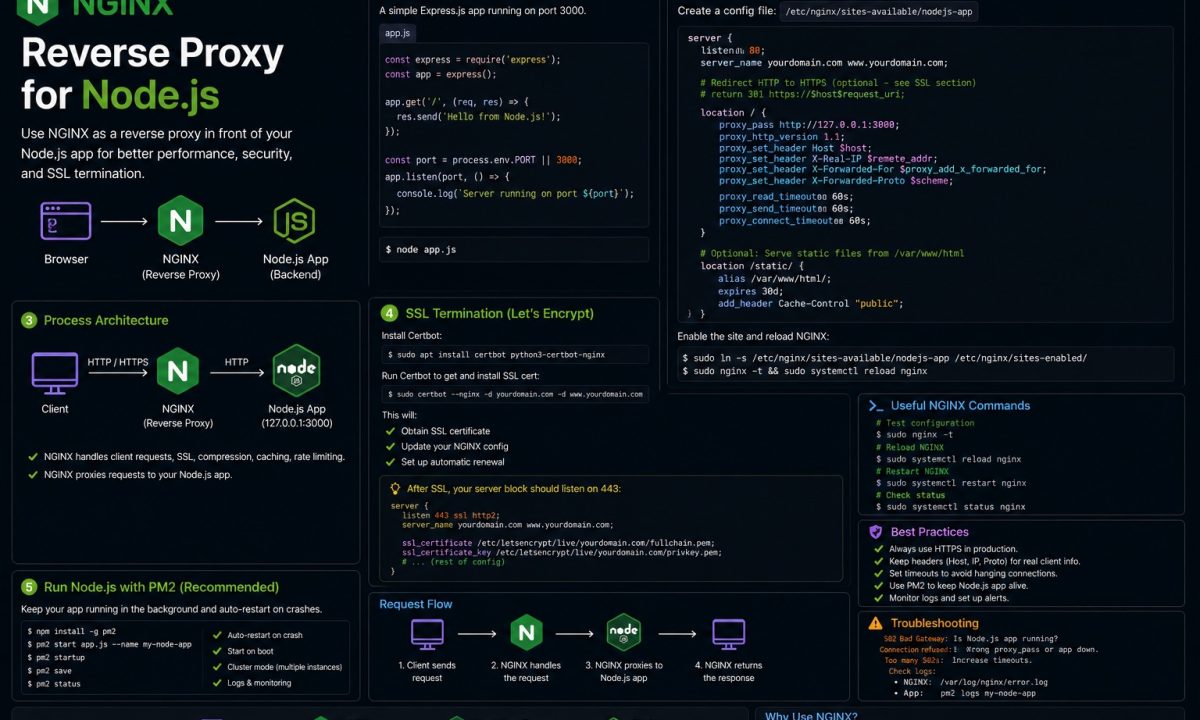
A working nginx reverse proxy for Node.js needs proxy_pass to the local app port, forwarded headers for the real client IP and protocol, WebSocket upgrade headers when needed, HTTPS termination, and buffering/timeouts tuned for streaming or slow responses. The common bug is a proxy that works locally but hides the real host, IP, or scheme from Express/Fastify.
An nginx reverse proxy for Node.js fixes all of that by sitting in front. It terminates TLS, serves static assets off disk, buffers slow clients so Node only sees complete requests, and lets you run three apps on one box behind one port 443. I run this exact setup on a $12 Hetzner VPS hosting two Fastify services and a static marketing site. Below is the config I actually use, in the order you’ll hit the problems — plus the part most tutorials skip, which is when putting nginx there is the wrong call.
What this guide covers:
- minimal
proxy_passsetup for a local Node process - forwarded headers and
trust proxy - WebSocket upgrade support
- HTTPS with certbot
- static files, gzip, buffering, timeouts, and load balancing
- cases where nginx is unnecessary because a PaaS or managed load balancer already does the job
The minimal server block that proxies to Node
Start with the smallest thing that works, then add. Node runs on 127.0.0.1:3000, nginx owns port 80, and every request gets handed inward.
# /etc/nginx/sites-available/myapp
server {
    listen 80;
    server_name app.example.com;

    location / {
        proxy_pass http://127.0.0.1:3000;
    }
}
ln -s /etc/nginx/sites-available/myapp /etc/nginx/sites-enabled/
nginx -t && systemctl reload nginx
Bind your Node app to 127.0.0.1, not 0.0.0.0. If you leave it on 0.0.0.0:3000, the app is reachable directly on the public IP and bypasses nginx entirely — TLS, rate limits, the lot. I’ve seen a “secured” site where port 3000 was wide open next to the nice HTTPS one. In your app: app.listen({ port: 3000, host: '127.0.0.1' }).
That nginx -t before the reload is your whole rollback story. nginx validates the full config and refuses to load a broken one; a reload with a syntax error leaves the old config running rather than dropping you to a dead default. Get in the habit — nginx -t && systemctl reload nginx as one command, never two separate ones where you forget the test.
The forwarded headers you must set (or every client looks like 127.0.0.1)
Here’s the first thing that breaks in a way staging hides. With the block above, your Node app sees every connection coming from 127.0.0.1, because that’s literally who’s talking to it — nginx, on loopback. Rate limiters key everyone to the same bucket. Your logs are useless. And req.protocol says http even though the user is on HTTPS, so any redirect to a canonical URL bounces them to an insecure one.
nginx doesn’t forward the original client details unless you tell it to. Set these four:
location / {
    proxy_pass http://127.0.0.1:3000;

    proxy_set_header Host              $host;
    proxy_set_header X-Real-IP         $remote_addr;
    proxy_set_header X-Forwarded-For   $proxy_add_x_forwarded_for;
    proxy_set_header X-Forwarded-Proto $scheme;
}
Host keeps virtual-host routing and any req.hostname logic intact. X-Real-IP is the single client IP. X-Forwarded-For uses $proxy_add_x_forwarded_for, which appends the client to any existing chain rather than overwriting it. X-Forwarded-Proto carries http or https so your app knows what the user saw, not what nginx forwarded over loopback.
Setting the headers is half the job. Node won’t trust them by default — and it shouldn’t, because a header is just a header a client could’ve forged. You opt in. In Express:
// You're behind exactly one proxy (nginx on the same box).
// '1' = trust one hop. Do NOT use `true` in production — that
// trusts the whole chain and lets a client spoof X-Forwarded-For.
app.set('trust proxy', 1);

app.get('/whoami', (req, res) => {
  res.json({ ip: req.ip, proto: req.protocol }); // real client IP + https
});
Fastify wires it at construction with trustProxy: 1. The reason it’s a number and not true: trust proxy set to true trusts the leftmost X-Forwarded-For entry unconditionally, so anyone hitting your app directly can lie about their IP and walk through an IP allowlist. One nginx hop means one trusted hop. The full matrix of values — loopback, subnets, hop counts — is in the Express behind-proxies docs. Get this wrong and your rate limiter from a rate-limiting middleware setup either throttles everyone as one IP or trusts a spoofable one. Both are bad in different directions.
WebSocket connections that 400 or hang
You ship a chat feature, it works locally where the browser hits Node directly, and the moment it goes behind nginx the socket either fails the handshake with a 400 or connects and then dies after a minute of silence. WebSockets start as an HTTP request carrying Upgrade: websocket, and plain proxy_pass over HTTP/1.0 strips that header on the way through. The handshake never completes.
Two things fix it: bump the proxy to HTTP/1.1, and pass the upgrade headers explicitly.
# Map block lives at the http {} level, outside any server block.
map $http_upgrade $connection_upgrade {
    default upgrade;
    ''      close;
}

server {
    listen 80;
    server_name app.example.com;

    location / {
        proxy_pass http://127.0.0.1:3000;

        proxy_http_version 1.1;
        proxy_set_header Upgrade    $http_upgrade;
        proxy_set_header Connection $connection_upgrade;

        proxy_set_header Host              $host;
        proxy_set_header X-Real-IP         $remote_addr;
        proxy_set_header X-Forwarded-For   $proxy_add_x_forwarded_for;
        proxy_set_header X-Forwarded-Proto $scheme;
    }
}
The map is the part people hardcode wrong. If you set Connection "upgrade" as a literal string on every request, plain HTTP requests also get told to upgrade and some clients choke. The map sends Connection: upgrade only when the client actually asked, and Connection: close otherwise — so the same location serves both your REST routes and your sockets.
That “dies after a minute” symptom is separate, and it won’t show in staging because nobody leaves a tab idle during a smoke test. nginx’s default proxy_read_timeout is 60 seconds, so an idle socket gets cut at exactly 60s. Raise it for long-lived connections and make sure the app sends ping/pong frames under that ceiling:
proxy_read_timeout 3600s;
proxy_send_timeout 3600s;
If you’re standing up Socket.IO specifically, the handshake quirks and sticky-session needs are worth a read in the Socket.IO guide before you scale past one Node instance.
HTTPS with certbot, and the HTTP→HTTPS redirect
You’re on plain port 80, which is fine until the first person notices the browser says “Not secure” next to a login form. You want TLS, you don’t want to pay for a cert, and you really don’t want to hand-edit ssl_certificate paths. certbot does all of it.
Point your domain’s A record at the server first — certbot proves you control the domain over port 80, so DNS has to resolve before this works. Then:
apt update && apt install certbot python3-certbot-nginx
certbot --nginx -d app.example.com
The --nginx plugin reads your existing server block, requests the cert from Let’s Encrypt, writes the listen 443 ssl lines and certificate paths into your config, and — when it asks — adds the HTTP→HTTPS redirect for you. Say yes to the redirect. After it runs, your config has a port-443 server block plus a small port-80 one that 301s everything up to HTTPS. The flow and the renewal details are in the certbot user guide.
Certs last 90 days. The certbot package installs a systemd timer that renews them automatically — verify it’s actually armed instead of assuming:
certbot renew --dry-run        # simulate a real renewal
systemctl list-timers | grep certbot
A dead renewal timer is the kind of thing that pages you at 90 days exactly, on a quiet Sunday, when nobody remembers setting it up. The dry run is thirty seconds of insurance. If you want the from-scratch droplet version of this, the DigitalOcean deploy walkthrough goes server-up.
gzip and serving static files from nginx, not Node
Every CSS file, every favicon, every JS bundle your Node process streams by hand is the event loop doing a janitor’s job a web server does in its sleep — uncompressed, and stealing cycles from request handling. Hand it to nginx.
# Static assets straight off disk, with a long cache and gzip.
location /static/ {
    root /var/www/myapp/public;
    expires 30d;
    add_header Cache-Control "public, immutable";
}

gzip            on;
gzip_types      text/css application/javascript application/json image/svg+xml;
gzip_min_length 1024;
Two cheap wins. nginx serves /static/ from disk and never touches Node, and gzip shrinks text responses ~70% before they hit the wire. Skip it on images and video — already compressed, so you’d just burn CPU. One catch: nginx only gzips the responses it generates. Bytes coming back through proxy_pass from Node pass through untouched, which is what you want — let Node compress the dynamic JSON, let nginx compress the static files.
Timeouts and buffering: the slow-client problem
This is the one I opened with, and it’s the strongest argument for nginx existing at all. Node’s concurrency model means a single connection that sends its request body slowly — phone on bad signal, a deliberately throttled attacker — occupies a handler the entire time. Enough slow clients and a healthy app stops answering fast ones. It’s a denial of service with no malice required.
nginx buffers by default, and that default is the feature. It reads the entire request from the slow client, then forwards a complete request to Node in one fast loopback burst. Node never waits on the slow socket. Same on the way out — nginx buffers the response and feeds the dawdling client while Node moves on. You mostly want the defaults, but make the timeouts explicit so you know what they are:
proxy_connect_timeout 5s;     # giving up reaching Node
proxy_send_timeout    60s;    # sending the request to Node
proxy_read_timeout    60s;    # waiting for Node's response (raise for WS)

client_body_timeout   10s;    # slow-client guard: drop a dribbling body
client_max_body_size  10m;    # reject oversized uploads early
client_body_timeout is the actual slow-client guard — it caps how long nginx tolerates a trickling request body before dropping it, and the attack never reaches Node. client_max_body_size matters because nginx’s default is 1MB, so the staging-vs-prod trap is real: file uploads work fine until a user sends an 8MB image and nginx returns 413 Request Entity Too Large before your app ever runs. Set it to match what your app accepts, and set it on both sides — nginx’s limit and your app’s body parser have to agree, or one rejects what the other allows.
Load-balancing multiple Node instances
One Node process uses one core. Your box has eight. Under real traffic that single process pins at 100% on one core while seven sit idle, and the fix is more processes with nginx spreading requests across them. An upstream block is the cleanest way.
upstream node_app {
    least_conn;                       # send to the least-busy worker
    server 127.0.0.1:3000;
    server 127.0.0.1:3001;
    server 127.0.0.1:3002;
    server 127.0.0.1:3003;
}

server {
    listen 80;
    server_name app.example.com;

    location / {
        proxy_pass http://node_app;   # name, not host:port
        proxy_set_header Host              $host;
        proxy_set_header X-Real-IP         $remote_addr;
        proxy_set_header X-Forwarded-For   $proxy_add_x_forwarded_for;
        proxy_set_header X-Forwarded-Proto $scheme;
    }
}
Run four copies of your app on four ports — PM2 cluster mode does this in one line and is covered in the PM2 production guide. least_conn beats the default round-robin when request durations vary, which they always do; the nginx upstream module docs list the other methods. One landmine: the default load balancing has no session stickiness, so if you hold WebSocket or session state in a single process, requests bounce between workers and break. Add ip_hash; to pin a client to one backend, or — better — push session state into Redis so any worker serves any request and you scale without stickiness at all.
Where nginx adds no value
nginx in front of Node is the right default on a VPS you own. It is dead weight, or actively in the way, in three setups:
- You’re on a PaaS that already terminates TLS. Railway, Render, Fly.io, Heroku — they run their own edge proxy, hand you HTTPS, and inject the
X-Forwarded-*headers. Bolting your own nginx inside the container adds a hop, a second config to maintain, and a place for forwarded headers to get mangled twice. Settrust proxyand bind to the port they give you; that’s the whole job. - You’re behind a managed load balancer. An AWS ALB, GCP Load Balancer, or DigitalOcean LB does TLS, health checks, and fan-out across instances. A per-instance nginx duplicates the load balancer’s job one layer down and buys you nothing but another thing to patch.
- A single container behind a cloud edge. One Cloud Run or Fargate container sitting behind the platform’s HTTPS endpoint doesn’t need an in-container proxy. Let the platform buffer and terminate; keep the image to just Node.
The pattern: nginx earns its place when you own the box and nobody upstream is already terminating TLS and buffering. The second a managed layer is doing that work, a second proxy is cost without benefit. And when you do tear nginx out of a Docker setup, make sure your container still shuts down cleanly without it — the graceful shutdown guide covers the signal handling that matters there.
FAQ
Do I still need PM2 if I have nginx?
Yes — they solve different problems and don’t overlap. nginx routes traffic, terminates TLS, and buffers clients, but it does not keep your Node process alive; if the app crashes, nginx just returns 502 Bad Gateway to everyone until something restarts it. PM2 (or a systemd service, or Docker’s restart policy) is the supervisor that brings the process back and runs one copy per core. Run both: PM2 keeps Node up, nginx puts it behind a real web server.
Why does my Node app see every request coming from 127.0.0.1?
Because it is — nginx talks to your app over loopback, so the connection genuinely originates at 127.0.0.1. The real client IP rides along in the X-Real-IP and X-Forwarded-For headers that nginx sets, but your app ignores them until you opt in with app.set('trust proxy', 1) in Express or trustProxy: 1 in Fastify. Set both the nginx headers and the trust setting, then req.ip gives you the actual client.
What’s the difference between proxy_pass with a trailing slash and without?
It changes how nginx rewrites the path, and it bites people constantly. proxy_pass http://127.0.0.1:3000; (no path, no trailing slash) passes the URI through unchanged, so /api/users reaches Node as /api/users. proxy_pass http://127.0.0.1:3000/; (trailing slash) strips the matched location prefix before forwarding, so a location /api/ would send /api/users to Node as /users. For a plain whole-app proxy, leave the trailing slash off and keep paths identical on both sides.
How do I fix WebSocket connections that work locally but fail behind nginx?
Add three directives to the location block: proxy_http_version 1.1, proxy_set_header Upgrade $http_upgrade, and proxy_set_header Connection $connection_upgrade (with the map block at the http level). Plain proxy_pass uses HTTP/1.0 and strips the Upgrade header, so the handshake never completes and you get a 400. If the socket connects but dies after about a minute, raise proxy_read_timeout above 60 seconds and send ping/pong frames from the app under that interval.
Does certbot break my existing nginx config when it adds HTTPS?
It edits the config in place, but it’s conservative — the --nginx plugin adds a listen 443 ssl block, writes the certificate paths, and optionally inserts the HTTP→HTTPS redirect, leaving your location rules and proxy settings intact. It also writes a .bak of the file before touching it. Run nginx -t afterward to confirm the result is valid, and certbot renew --dry-run to verify auto-renewal is wired before you forget about it for 90 days.
Should I gzip responses in nginx or in my Node app?
Let nginx gzip the static files it serves off disk, and let Node compress the dynamic responses it generates — they don’t fight. nginx only gzips responses it produces itself; bytes coming back through proxy_pass from Node are passed through as-is, so if your app already returns gzipped JSON, nginx forwards it untouched. Skip compression on images and video in both layers — they’re already compressed and you’d just spend CPU re-doing nothing.
Can nginx load-balance across multiple Node processes on the same machine?
Yes — define an upstream block listing each 127.0.0.1:PORT, then proxy_pass http://your_upstream_name. Start one Node copy per port (PM2 cluster mode automates this), and nginx fans requests across them; least_conn distributes better than the default round-robin when request times vary. If you hold session or WebSocket state in a single process, add ip_hash to pin clients to one backend, or move that state into Redis so any worker can serve any request.